Archive for February, 2009

Gnome Display Manager problems (error setting mtrr) in Ubuntu Intrepid 8.10

Posted in Linux (Ubuntu) with tags , , , , , , , , on February 26, 2009 by HydTech

Last night I spent a lot of time trying to get my Gnome Display manager to work in Ubuntu Intrepid 8.10. Alot of people are having a hard time with the display after upgrading from Hardy 8.04 to Intrepid 8.10.
Every time I try to shutdown the system, I get an error about “error setting MTRR”. These are the steps I took to fix the issue.

*IMPORTANT*- before doing any troubleshooting with X, I recommend backing up the xorg configuration file.
sudo cp /etc/X11/xorg.conf /home/user/Desktop/xorg.conf.old

I tried clearing out the /proc/mtrr and rewriting it by using the following commands:

echo "disable=0" >| /proc/mtrr
echo "disable=1" >| /proc/mtrr
echo "disable=0" >| /proc/mtrr

and inserting

echo "base=0x00000000 size= type=write-back" >| /proc/mtrr

check here for more help.

Still no luck.

Tired and frustrated, I decided to reinstall

sudo apt-get install --reinstall gdm, nautlius, ubuntu-desktop, x-gnome-session, xserver-xorg

I finally did:
sudo update-alternatives --configure x-session-manager
More on update-alternatives here.

Searching on the web, I found this on bugs.launchpad.net

I had this problem exactly as described in the original report, after an upgrade from 8.04 to 8.10.

I eventually tracked it down to a dangling link from /etc/alternatives/x-session-manager. It was pointing to a nonexistent KDE4 startkde script, which presumably used to exist in 8.04. I had never actually used KDE4 seriously, but I must have installed it at some point in the old system and run it before reverting to gnome. I guess that means the old KDE4 start script was equally capable of restoring a gnome session, or something.

Anyway, “sudo update-alternatives –auto x-session-manager” seems to fix it.

(The workaround described in an earlier comment, of explicitly running the GNOME session type, also worked. But I wanted to find a fix that would work for the X client script option as well, because I was also trying to investigate the session script to work out why my session was not being restored properly. Unfortunately, then I ran into bug 249373, “gnome session does not restore the previous session” — which answers that one. I would never have upgraded to 8.10 if I had known about that absolutely amazing regression. But that’s another matter.)

Chris

After all that, I replaced my backup xorg.conf file
sudo cp /home/user/Desktop/xorg.conf.old /etc/X11/xorg.conf

Restarted the system, and now its working fine!
How to connect to wireless network from command line without GUI in Ubuntu

Posted in Linux (Ubuntu) on February 26, 2009 by HydTech

While trying to fix my Gnome Display Manager, apt-get removed several other packages besides gdm when I marked it for removal it. I had no GUI and no internet connection. I needed a way to connect to the internet to sudo apt-get install gdm (install gdm back).

I first had to find out the interface of my wifi card:
lshw -C network
this shows the network interfaces available on your system. Where it says logical name, this is what the interface is. lshw is a tool used to find hardware configuration information. my interface showed wmaster0, but for some reason it actually is wlan0.
I did:
sudo ifconfig wlan0 up to bring up the interface
sudo iwlist wlan0 scan to find my network
sudo iwconfig wlan0 essid "NETGEAR" key (10digitWEP) to connect
sudo dhclient wlan0 to get an assigned IP with DHCP

Didn’t work because I had WPA set up and for that I would need wpa supplicant, so I disabled the WPA on my router and typed:
sudo iwconfig wlan0 essid "NETGEAR" key off
sudo dhclient wlan0

worked!

I was going to write a detailed guide about troubleshooting the wireless from the command line, but then I found this great article by ubuntugeek.

How to fresh install OpenOffice 3.0.1 on Ubuntu 8.10 Intrepid, 9.04 Jaunty, Fedora 10 and openSuse 11

Posted in fedora, Linux (Ubuntu), opensuse with tags , , , , , , , on February 24, 2009 by HydTech

Instructions for Ubuntu:

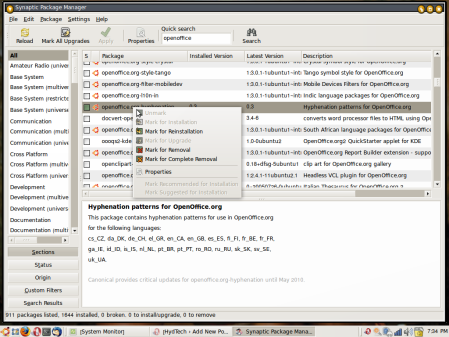
Yesterday I noticed that the menu on my OpenOffice had some weird characters. I finally figured out that some of the system fonts in Ubuntu are not compatible with OO. I managed to change the fonts back by going to System -> Preferences -> Appearance -> Fonts. But it was too late. During the process I upgraded, uninstalled the whole program and reinstalled it back again. For this process, I used synaptic package manager to find everything that said openoffice and marked it for complete removal.

remove OpenOffice

I could have also opened up terminal and typed:
sudo apt-get remove openoffice*.*

Then, I went to openoffice.org and downloaded the .deb file for 3.0.1 (OOo_3.0.1_LinuxIntel_install_en-US_deb.tar.gz) and extracted it to the desktop. Then I typed:
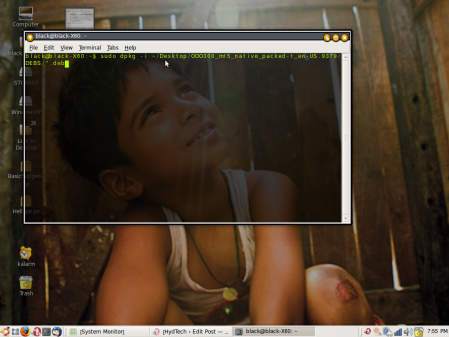
sudo dpkg -i ~/Desktop/OOO300_m15_native_packed-1_en-US.9379/DEBS/*.deb
install_office

dpkg is a tool to install, build, remove and manage Debian GNU/Linux packages. The -i option is used to install a file or in this case, several files. We selected *.deb which means select all the files with a .deb extension and install them. We could have alternatively double clicked each .deb package and installed it separately, but the command line is a much more powerful option.

Next, to install the last package stored in a different folder, I typed:
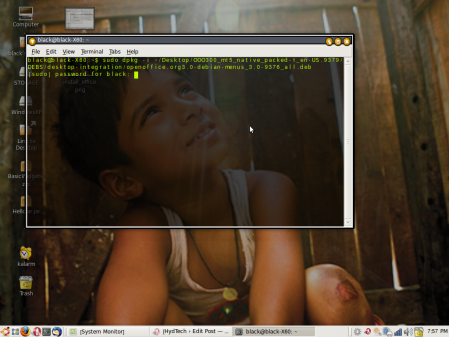
sudo dpkg -i ~/Desktop/OOO300_m15_native_packed-1_en-US.9379/DEBS/desktop-integration/openoffice.org3.0-debian-menus_3.0-9376_all.deb
install_office2

I believe I could have used the –recursive or -R option and specified the directory, which would have installed all the packages in the folder including all the sub-folders.

That’s all it took.

Instructions for Fedora and openSuse:

Goto openoffice.org and Download the rpm in tar.gz format onto the Desktop

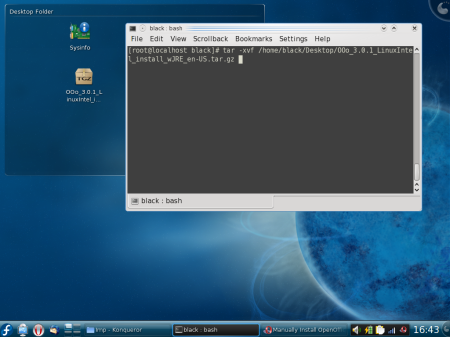
open up terminal, become root and untar the file:
su
(enter password)
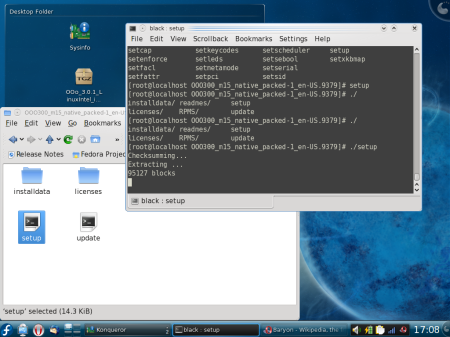
tar -xvf /home/black/Desktop/OOo_3.0.1_LinuxIntel_install_wJRE_en-US.tar.gz

oo1
cd into the directory:
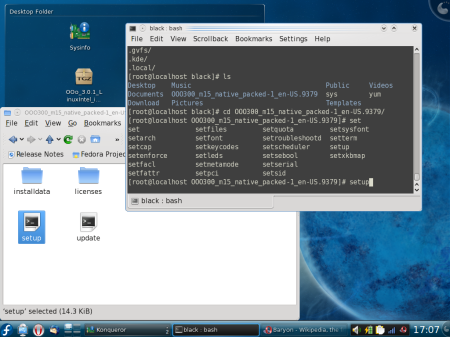
cd OOO300_m15_native_packed-1_en-US.9379/
oo2
setup:
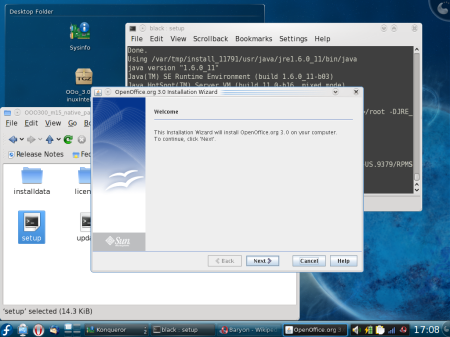
./setup
oo3
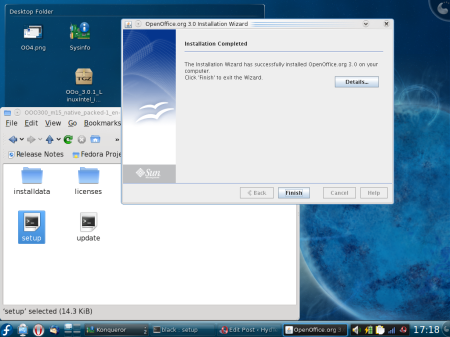
follow install directions:
oo4

oo5

Yatta !

How To connect to Remote Desktop from Windows to Ubuntu through G1 tether

Posted in Android, Linux (Ubuntu) with tags on February 22, 2009 by HydTech

From my previous post, you already know how to tether your G1 with your computer for internet use. I’ve been using it for a couple of weeks now. It’s been kinda slow with my 9.99 tzones, so I am trying to decide if it would be worth it for me to upgrade to the G1 data plan and use EDGE speeds. I managed to forward the remote desktop on my Ubuntu Linux using NX and it is much faster than VNC. There is one problem if you are using the Tetherbot proxy (check my previous post), you can only use the Internet through a SOCKS v5 proxy, or use the port bouncer.

To use the port bouncer, enter in the server details and the port you are using, for example, I am using FreeNX so I would use port 22.
Start the Tunnel.
Connect the G1 to your PC.
Open the cmd prompt
Type in:
Windows: adb forward tcp:4444 localabstract:Tunnel
Linux/Mac: ./adb forward tcp:4444 localabstract:Tunnel
With the NX client, you would connect to localhost as the server and use port 4444.

Now, you should be able to access remote desktop through the G1.

Set Default Applications in Ubuntu

Posted in Linux (Ubuntu) with tags on February 15, 2009 by HydTech

There are two ways:

First is to goto System -> Preferences -> Preferred applications

Second is update-alternatives. So to update the web browser you would type:
sudo update-alternatives --config x-www-browser

Now select the browser you want. This is self explanatory. Make sure you change the default with both methods because for me it wouldn’t work when i just did the update-alternatives method.

How to use Remote Desktop Connection with Ubuntu

Posted in Linux (Ubuntu) with tags on February 15, 2009 by HydTech

To learn the basics and different methods of remote desktop, see my previous article.

The most popular way of remote desktop on Ubuntu is using VNC (RFB) but this is very slow because it works by sending compressed bitmap images of your server to the client.

To set up remote desktop this way, goto system -> prefereces -> remote desktop -> select ‘allow other users to view your desktop’ and ‘allow other users to control your desktop’. If you are behind a firewall or router, you have to open up the corresponding ports.

On the client computer, you can download a viewer like TightVNC or UltraVNC. This tutorial can help you encrypt this information through ssh.

However, I found a great alternative called NX. NX works by starting a new X session when you log in. If you have Ubuntu Intrepid Ibex, you can follow this tutorial.

Basics of Remote Desktop Connection

Posted in Linux (Ubuntu) with tags on February 15, 2009 by HydTech

Remote Desktop connection is a method of accessing your computer from another computer. Check Wikipedia for more information. There are several different methods of remote display like VNC, RDP, ICA, Logmein, hamachi, crossloop, etc.. Check this comparison chart.

My next post shows how to use Remote Desktop on Ubuntu Linux, through both VNC and NX.

Connect Tether your laptop to the internet using the G1 as a modem

Posted in Android, Linux (Ubuntu) with tags on February 12, 2009 by HydTech

moved to http://hydtechblog.com/2009/02/12/connect-your-laptop-to-the-internet-using-the-g1-as-a-modem/

How to register and sign in the Tmobile G1 without data plan on tzones hack

Posted in Android, Linux (Ubuntu) with tags on February 11, 2009 by HydTech

The key to sign in to your G1 is to have internet connection.  If you have a g1 data plan, you connect through tmobile’s epc server and sign in.  You should have the g1 data plan when you first get your G1 from tmobile, but for some reason if you reformatted your phone or downgraded/upgraded and needed to sign in again, you can do it through tzones or by enabling the wifi.

To do this without tzones through wifi, you need to have root access on your G1. check this forum for help with turning your wifi on.

If you have tzones, hit the menu button when it asks you to sign in.  click on apn settings and change the Tmobile US settings by following my older post.   Now you should have internet access through WCDMA and you should be able to sign in.

T-mobile G1 internet with 9.99 Tzones hack, 5.99 no more :(

Posted in Android, Linux (Ubuntu) with tags on February 10, 2009 by HydTech

Hooray! It works!
T-mobile doesn’t have the 5.99 tzones plan anymore. They upped it to a 9.99 plan. Don’t get rid of your 5.99 plan if you still have it!!! But the tzones hack still works. To get it working on your G1, check my post about getting the MMS to work without having a data plan here.
Then go into your test settings and change the data method to WCDMA preferred or unknown. If you get connectivity errors, you can goto settings and select ‘use only 2G’. This also saves aloooot of battery.

If you want to tether your laptop to use the internet from the G1 check my post here.